Using Python to Convert IP Addresses Into Location Data
Welcome to our blog on "Using Python to Convert IP Addresses Into Location Data." In this digital age, understanding the geographical location of users can be invaluable for various applications, from targeted marketing to security measures. But first, let's explore an IP geolocation address and why it holds such significance. We'll then delve into the necessity of converting IP addresses to location data using locations API.
While numerous Location APIs are available, we will focus on 'IPstack,' a popular and user-friendly choice. We'll guide you through converting an IP address to location data using Python and IPstack. By the end, you'll possess a powerful tool to unlock valuable insights from IP addresses. Let's get started!

What Is an IP Address?
An IP address, short for Internet Protocol address, is a numerical label assigned to each device connected to a computer network that uses the Internet Protocol for communication. It serves as a unique identifier. Hence, allowing devices to send and receive data across the internet.
For example, an IPv4 address appears like "192.168.1.1," and an IPv6 address resembles "2001:0db8:85a3:0000:0000:8a2e:0370:7334."
Understanding IP addresses is crucial for locating devices, managing network traffic, and ensuring secure communication.
Why Do We Need to Convert IP Addresses to Location Data?
Converting IP addresses to location data is essential for various reasons.
Firstly, it helps businesses tailor their services, content, and advertisements based on users' geographical locations, enhancing the overall user experience.
Secondly, it aids in detecting and preventing fraudulent activities by verifying the authenticity of the IP's origin.
Moreover, it plays a crucial role in website analytics, enabling organizations to understand their global audience and make informed marketing strategies and resource allocation decisions.
Can We Use Locations API to Convert IP Addresses to Location Data?
Yes. We can use a Locations API like "IPstack" to convert IP addresses into location data.
IPstack
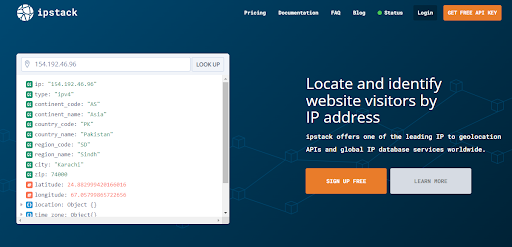
IPstack is a popular and reliable API that provides geolocation data based on IP addresses. By making API requests with an IP address as input, Ipstack returns valuable information such as the country, region, city, latitude, and longitude associated with that IP.
This data can be utilized for various applications, including personalization, analytics, and security. IPstack is an excellent choice for developers who convert IP addresses into location data efficiently and accurately.

How to Convert an IP Address to Locations Data Using IPstack?
Let's begin our development process step by step.
First, create a directory where you will place all your files. We did it through a command prompt. Then, we opened the directory/folder inside the visual studio code. In the same folder, we created a file and named it app.py. Then, we added the following code to it. The below code helps us fetch data through Ipstack API. Make sure you enter your API key inside the code.
First of all, import Flask, render_template, and requests.
    from flask import Flask, render_template, requests
    import requests
Then, under the same code, define your function to fetch API data from IPstack.
    # app.py
    from flask import Flask, render_template, request
    import requests

    app = Flask(__name__)

    def get_location_data(ip_address, api_key):
        base_url = "http://api.ipstack.com/"
        response = requests.get(f"{base_url}{ip_address}?access_key={api_key}")
        data = response.json()
        return data

    @app.route("/", methods=["GET", "POST"])
    def index():
        if request.method == "POST":
        api_key = "YOURAPIKEY"  # Replace 'YOUR_API_KEY' with your actual Ipstack API key
        ip_address = request.form["ip_address"]
        location_data = get_location_data(ip_address, api_key)

        if "error" in location_data:
            error_message = location_data["error"]["info"]
            return render_template("index.html", error_message=error_message)
        else:
            return render_template("index.html", location_data=location_data)
    else:
        return render_template("index.html")

    if __name__ == "__main__":
        app.run(debug=True)
The code also renders the index.html file to get our response on a web browser like Chrome.
The next step is to create an HTML file. Create a folder and name it templates. Then, create a file "index.html" inside that newly created folder. This file performs the following functions:
Links to styles.css file.
Helps us enter the IP address and create a submit button.
Returns information of location linked with your IP address.
    <!-- index.html -->
    <!DOCTYPE html>
    <html>
    <head>
    <title>IP Address Location Lookup</title>
    <link rel="stylesheet" type="text/css" href="{{ url_for('static', filename='styles.css') }}">
    </head>
    <body>
    <h1>IP Address Location Lookup</h1>
    {% if error_message %}
    <p>Error: {{ error_message }}</p>
    {% else %}
    <form method="post">
    <label for="ip_address">Enter IP Address:</label>
    <input type="text" id="ip_address" name="ip_address" required>
    <button type="submit">Submit</button>
    </form>
        {% if location_data %}
        <h2>Location Data</h2>
        <p>IP Address: {{ location_data["ip"] }}</p>
        <p>Country: {{ location_data["country_name"] }}</p>
        <p>Region: {{ location_data["region_name"] }}</p>
        <p>City: {{ location_data["city"] }}</p>
        <p>Latitude: {{ location_data["latitude"] }}</p>
        <p>Longitude: {{ location_data["longitude"] }}</p>
        {% endif %}
    {% endif %}
    </body>
    </html>
Finally, we will create a folder and name it static. In this file, we will place all the styling details. You can modify the details according to your choice or copy-paste the exact code given below:
    /* styles.css */
    body {
        font-family: Arial, sans-serif;
        margin: 20px;
        text-align: center;
        background-image: url('https://cdn.pixabay.com/photo/2018/01/31/05/43/web-3120321_1280.png');
        background-repeat: no-repeat;
        background-position: center;
        background-size: 100% 100%;
        margin: 0;
        padding: 0;
        height: 100%;
    }
    html {
        height: 100%;
    }

    h1 {
        color: #333;
    }

    form {
        margin-top: 20px;
    }

    label {
        display: block;
        margin-bottom: 5px;
    }

    input[type="text"] {
        padding: 5px;
        width: 200px;
        border: 1px solid #ccc;
        border-radius: 4px;
    }

    button {
        padding: 8px 12px;
        margin-top: 10px;
        background-color: #4CAF50;
        color: #fff;
        border: none;
        border-radius: 4px;
        cursor: pointer;
    }

    button:hover {
        background-color: #45a049;
    }

    p {
        margin-bottom: 10px;
    }

    .error-message {
        color: #ff0000;
    }
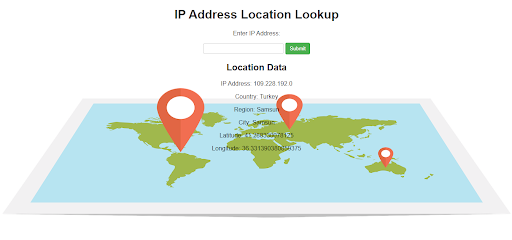
Here is our output. We enter the IP address inside the tab, which returns the location information.

Conclusion
Harnessing the power of Python to convert IP addresses into location data opens up a world of possibilities for businesses and security applications alike. By utilizing APIs like IPstack, developers can seamlessly extract valuable geolocation information based on IP addresses. This data empowers businesses to tailor their services, content, and marketing strategies to specific regions. Hence, optimizing user experiences.
It also plays a vital role in enhancing cybersecurity by detecting and preventing fraudulent activities. The process becomes straightforward and efficient with Python's versatility and ease of integration. Embracing this technique gives organizations a powerful tool to gain valuable insights and make informed decisions. Hence, driving success in the digital landscape.
FAQs
What Is a Location API?
A Location API is a service that provides geolocation data based on IP addresses or device coordinates.
What Is Places API Used For?
Places API is used to retrieve location-based data such as places, addresses, and geographic coordinates for mapping and location-based services.
Is Location API Free?
The availability of free Location APIs varies. Some APIs offer free tiers with limited usage, while others may charge for extensive access.
Does Google Maps Use Places API?
Yes, Google Maps uses the Places API to provide location-based information and services to users and developers.